There are so many different things you can do in Photoshop. The main thing Photoshop is used for is to edit pictures and photography. It’s also used by both amateurs and professionals alike. What makes Photoshop so unique is that there are numerous ways to do one thing. To do something in Photoshop, you use a tool. There are dozens of weapons in Photoshop such as the brush tool, the dodge tool, the burn tool, the zoom tool, the smudge tool, and much more. Some tools are more complex than others, and some tools are relatively simple. It all depends on what you want to do in Photoshop.

However, once you master one tool, it opens the door for other tools as well.
As previously stated, one thing you can use Photoshop for is to edit photos and pictures.
Contents
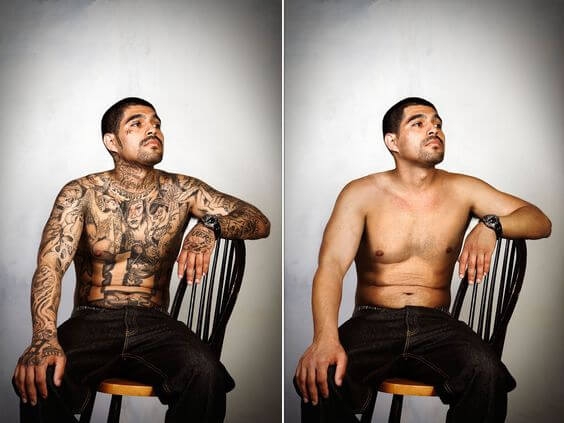
One thing professional photographers almost always edit out of there photos is tattoos.
Tattoos can be somewhat distracting from the beauty of a photo, so they’re almost always edited out. In this tutorial, I will show you how to edit out a tattoo using two different tools, the patch tool and the healing brush tool. Each will help you work with different size tattoos and deliver the same results: flawless skin.
To help you through this tutorial, you will need to find a photo of a tattoo. The tattoo can be anywhere, but usually, a face-on shot will work best. It doesn’t matter if it’s colored or black either. If you don’t have a picture of a tattoo on the skin, try finding one on sxc.hu or morguefile.com. Both offer free photos to use.
So let’s begin!
The Patch Tool – Small Tattoos
Step 1) Open up your picture in Photoshop (whatever version you have). Do this by going File and Open. If you’re copying and pasting your photo off the web, go to File and New. The size of the canvas will automatically adjust to the size of your photo.
Step 2) Zoom in on the tattoo by clicking the Zoom Tool on the free-floating vertical menu bar.
Step 3) Next, select the Patch Tool. It’s also located on the free floating vertical menu bar. It’s grouped with the Spot Healing Brush Tool, the Healing Brush Tool, and the Red Eye Tool.
Step 4) Using the patch tool, draw around the small tattoo completely until the dotted link is linked.
Step 5) Drag the selection to a different part of the skin. It’s best to go right around the area, so it blends well. Make sure you select a new area of the skin that doesn’t have any of the tattoos on it.
Step 6) Unclick your mouse and the tattoo should be gone. If there is some color left, circle it again using the Patch tool and keep patching into the color is gone.

Healing Brush Tool – Large Tattoos.
Step 1) Open up your picture in Photoshop (whatever version you have). Do this by going File and Open. If you’re copying and pasting your photo off the web, go to File and New. The size of the canvas will automatically adjust to the size of your photo.
Step 2) Select the Healing Brush tool on the vertical menu bar.
Step 3) Identify an area of the skin that is not covered by the tattoo. Clicking ALT while you click the mouse, go over the skin where there is no tattoo.
Step 4) Next, click/paint over the tattoo. Once you lift the mouse it should be blended better. Continue steps 3-4 until the tattoo is completely blended away.